
Tuesday, March 1, 2022
New Book at the Apple eBook Store
Extreme Macro the Art of Patience Volume II is available at the Apple eBook store :)
Thursday, January 27, 2022
Topaz Labs Clarity
I have some good news! As many of you know I use Topaz Labs Clarity for editing my photos, but unfortunately it has been discontinued by Topaz. I sent an email to them asking about allowing access to the plugin and this is what their tech support said:
"Hi John,
Thank you for your patience as we have been experiencing very high ticket volume over the last month. This has been a highly abnormal season for us and you can expect a follow-up reply within 1 to 2 business days at the latest.
You can still access the classic products from our Topaz Labs Legacy Products Page, although it is important to note that these have been discontinued. We cannot guarantee full functionality going forward as computers and operating systems update and advance and the legacy programs do not.
You can share your license number with your friends that want to use Clarity, 409619-141022-553084-072858-323405
Please let me know if that helps or if I can do anything else to further assist you. Thanks!"
So if you want to use Clarity just go the the link above and use my product key :) Thanks Topaz Labs!
Friday, January 14, 2022
Light Quality Tutorials
I stumbled onto a couple of really good light tutorials on YouTube. If you are havng difficulty getting good light quality these videos may help you sort it out.
Saturday, January 8, 2022
How a Nat Geo Photographer Selects the Best Images from a Shoot | Whittle Down | WIRED
Steve Winter has been a contributing wildlife photographer for National Geographic. In this video, shot for Wired, he explains his thought process on composition and how he selects his best images. A lot of what he does I have been doing as well, although I tend to shoot more portraits. Steve says some things about framing with the view finder and cropping that sound familiar to me for some odd reason... ;)
Friday, December 31, 2021
Extreme Macro the Art of Patience Volume II
It only took me 12 years, but I finally published Extreme Macro the Art of Patience Volume II today. It is available in several formats and should already be available in Apple eBook format from Blurb (from Apple as well as soon as they accept it). The add for it on the sidebar to the right.
In my last post I spoke about my adventures in cropping, something that I had to do for the book to an extent because the 3x2 aspect ratio of my images did not always fit the aspect ratio of the book. But there is another reason why I am going to crop more in the future, and it is an issue of technique. I look at a scene and try to figure out what magnification I need for the shot that is in my head, set the MP-E 65mm to that mag, and then attempt to grab onto whatever the subject is on with my non camera hand. I then rest the lens on that same hand so that critter and camera are on the same "platform". I focus by sliding the camera on my hand and then "bend" the area of acceptable focus by twisting my wrists(s) so that it is falling where I think it needs to be in the frame. Odds are once I get into place I cannot back out and make changes to the magnification without spooking the subject. While photographing this Chafer Beetle eating pollen...
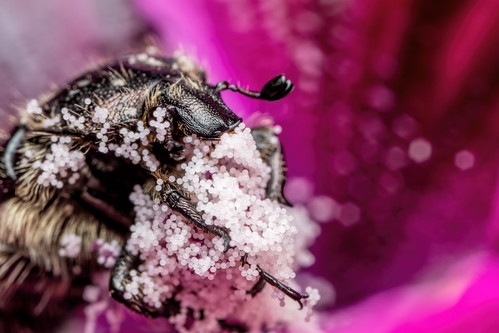
...I though the framing was not tight enough, so I backed out to increase the magnification. But, unfortunately, the critter noticed me and took off. If I had just stayed where I was and continued shooting, I could have simply cropped in post to get the subject framing that I wanted without spooking the subject. As an added benefit I can take advantage of the depth and detail from shooting at a lower magnification. So, although I will continue to do all of my framing and composition with the view finder, I am going to crop in post more. Since Elements 2022 can upscale a crop to the original pixel count, I do not have to worry about how my images will look in print. So cropping is going to be a win win option for me if I can break some old habits...
In my last post I spoke about my adventures in cropping, something that I had to do for the book to an extent because the 3x2 aspect ratio of my images did not always fit the aspect ratio of the book. But there is another reason why I am going to crop more in the future, and it is an issue of technique. I look at a scene and try to figure out what magnification I need for the shot that is in my head, set the MP-E 65mm to that mag, and then attempt to grab onto whatever the subject is on with my non camera hand. I then rest the lens on that same hand so that critter and camera are on the same "platform". I focus by sliding the camera on my hand and then "bend" the area of acceptable focus by twisting my wrists(s) so that it is falling where I think it needs to be in the frame. Odds are once I get into place I cannot back out and make changes to the magnification without spooking the subject. While photographing this Chafer Beetle eating pollen...
...I though the framing was not tight enough, so I backed out to increase the magnification. But, unfortunately, the critter noticed me and took off. If I had just stayed where I was and continued shooting, I could have simply cropped in post to get the subject framing that I wanted without spooking the subject. As an added benefit I can take advantage of the depth and detail from shooting at a lower magnification. So, although I will continue to do all of my framing and composition with the view finder, I am going to crop in post more. Since Elements 2022 can upscale a crop to the original pixel count, I do not have to worry about how my images will look in print. So cropping is going to be a win win option for me if I can break some old habits...
Wednesday, December 29, 2021
Painting Myself Out of a Corner
Back when I started shooting color positive slides in the late 80s there was a lot of emphasis on using the viewfinder for composition, and to crop in post only when necessary. Composing with the viewfinder has made me a better photographer, and in time while framing one scene other compositions would pop into my head. Subject permitting, I can get those scenes into the camera so composing with the viewfinder is a good thing. I also wanted to keep as many pixels as possible because when I make prints, I like to print them poster size (90CMx60CM on matte canvas and gallery wrapped). Back when I was shooting with 10MP and 12MP cameras not cropping in post was beneficial for making those large prints.
But not cropping at all in post has been detrimental to my photography because no matter how much effort I put into composing with the camera sometimes I do not see a better way to frame the subject until I can view the image on a bigger screen. Plus, I like to shoot active critters and they do not seem to cooperate. So, nailing the framing with the view finder is not always possible. Also due to the way that I shoot, holding on to the critter's perch with my non camera hand, I must guess what the magnification needs to be to get the framing that I want before I move in to take a shot. Once I am in position it is difficult to back out and make changes without spooking the subject. So, if I start shooting and realize that the framing is not what I want I am better off just cropping in post. Since I am shooting with a 24MP sensor I can afford to toss out a some of the pixels without sacrificing print quality, so I decided to start cropping when it makes sense to do it.
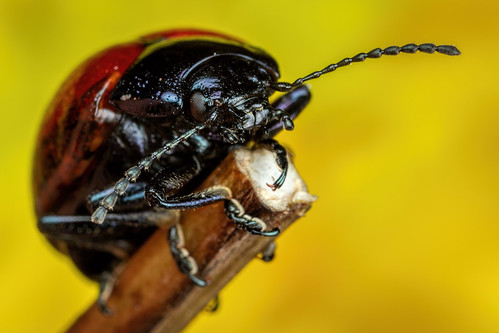
I use Photoshop Elements 2022 for my image editing and while cropping a shot I got a nice surprise: If I set the aspect ratio to the same aspect ratio as the original image, at 300 DPI, I end up with a 24MP image even after cropping. Elements must be extrapolating out the data and, so far, it looks good. I have been cropping after color correction and sharpening, and the detail seems to be holding up. One of the benefits of being able to crop and keep the mega pixel count high is that I can shoot at lower magnifications than I normally would and get more depth of field. So, cropping an image in post is going to be good for making the most out of the limited depth in a single frame. I took this shot at about 1.5x and cropped it slightly to eliminate some dead space to the right of the subject. The composition of the original shot is fine, but making it tighter looks better to me.
I will still compose with the view finder, but I am not going to avoid the cropping tool if it will make my images look better...
But not cropping at all in post has been detrimental to my photography because no matter how much effort I put into composing with the camera sometimes I do not see a better way to frame the subject until I can view the image on a bigger screen. Plus, I like to shoot active critters and they do not seem to cooperate. So, nailing the framing with the view finder is not always possible. Also due to the way that I shoot, holding on to the critter's perch with my non camera hand, I must guess what the magnification needs to be to get the framing that I want before I move in to take a shot. Once I am in position it is difficult to back out and make changes without spooking the subject. So, if I start shooting and realize that the framing is not what I want I am better off just cropping in post. Since I am shooting with a 24MP sensor I can afford to toss out a some of the pixels without sacrificing print quality, so I decided to start cropping when it makes sense to do it.
I use Photoshop Elements 2022 for my image editing and while cropping a shot I got a nice surprise: If I set the aspect ratio to the same aspect ratio as the original image, at 300 DPI, I end up with a 24MP image even after cropping. Elements must be extrapolating out the data and, so far, it looks good. I have been cropping after color correction and sharpening, and the detail seems to be holding up. One of the benefits of being able to crop and keep the mega pixel count high is that I can shoot at lower magnifications than I normally would and get more depth of field. So, cropping an image in post is going to be good for making the most out of the limited depth in a single frame. I took this shot at about 1.5x and cropped it slightly to eliminate some dead space to the right of the subject. The composition of the original shot is fine, but making it tighter looks better to me.
I will still compose with the view finder, but I am not going to avoid the cropping tool if it will make my images look better...
Thursday, November 25, 2021
Bugslife Bug Photography Second Place Award
I took second place in the Bugslife Bug Photography Awards in the flies, bees. ants, and wasps category for this shot:
Subscribe to:
Posts (Atom)